
|
NOTE |
|---|
|
In a closed-loop configuration with the BMS Lithium Batt function enabled, the BMS_Err_Stop parameter must be enabled. If the BMS_Err_Stop parameter function is not enabled, in the event of a communication error, the Deye inverter-charger will continue to operate based on the last communicated battery values. Depending on the mode of operation at the time of communication fault and given enough time, the Deye invertercharger will eventually put the attached battery into an overcharged or fully discharged state. When that occurs, either situation will trigger the Discover Lithium Battery BMS to self-protect and disconnect the battery from the system. |
After selecting the Deye communication protocol for the LYNK II, complete the closed-loop configuration settings on the Deye inverter-charger. Ensure the Discover Lithium Batteries are networked with LYNK II and that the LYNK II is connected to the Deye CAN port.
If necessary, first configure Deye inverter-chargers to operate in parallel by establishing the inverter-charger master/slave relationships and phase designations before setting the parameters for battery operation. Configuring the master invertercharger will cascade parameters and settings to the slave inverter-chargers.
Closed-loop Configuration
Refer to the latest Discover Energy Systems documentation for battery values and the latest Deye documentation for menu navigation and details on the setup procedure.
-
Set the Discover Lithium batteries to ON and set the inverter-charger to ON.
-
Using the touch screen and keypad on the inverter-charger, navigate to Main Screen > System Setup > Battery Setting.
-
Specify the battery settings according to the instructions in the tables that follow.
-
Touch the Up and Down arrows to scroll through the screens. Touch the checkmark button to save changes.
-
Exit and restart the inverter-charger.
|
NOTE |
|---|
|
If using multiple inverter-chargers, configure Deye inverter-chargers to operate in parallel before setting the battery operation parameters. |
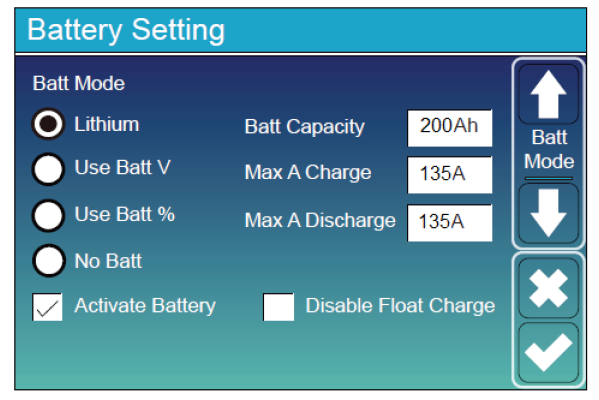
Main Screen > System Setup > Battery Setting
|
Battery Setting (page 1) |
|
|
|---|---|---|
|
Batt Mode |
Select the Lithium option to use the battery BMS. |
|
|
Activate Battery |
Select this check box. |
|
|
Batt Capacity |
Number of batteries x 100 Ah |
Number of batteries x 314 Ah |
|
Max A Charge Max A Discharge |
Number of batteries x 70 A |
Number of batteries x 200 A NOTE: Each HELIOS ESS battery is rated at a 200 A charge/discharge rate, but when connected in parallel, the maximum current is limited by internal busbars. For the recommended maximum current for paralleled HELIOS ESS, refer to the HELIOS Manual, Minimum Specifications for Battery Systems. |
|
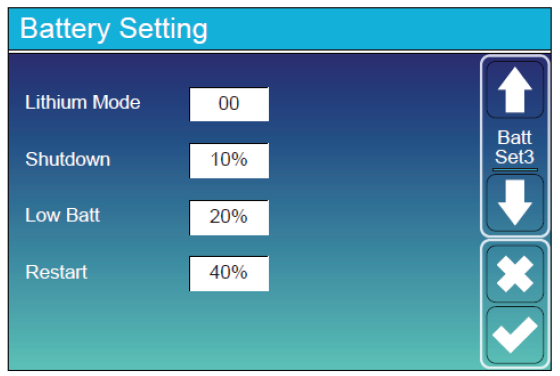
Battery Setting (page 3) |
|
|---|---|
|
Lithium Mode |
Set this value to 00. |
|
Shutdown |
Adjust values to support the use case or keep the original values. |
|
Low Batt |
|
|
Restart |
|
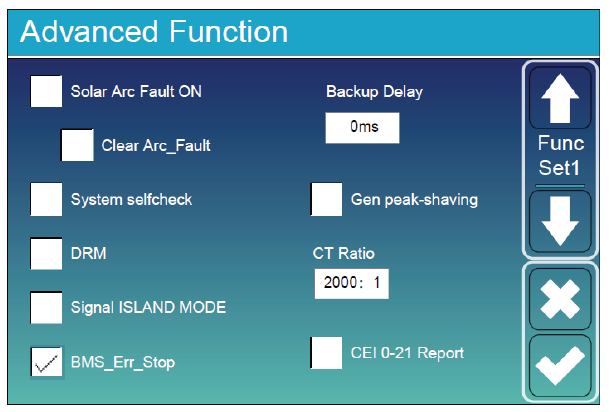
Main Screen > System Setup > Advanced Function
|
Advanced Function |
|
|---|---|
|
BMS_Err_Stop |
Select this check box to cause the inverter-charger to stop operating if there is a communication error. If the BMS_Err_Stop check box is cleared, despite a communication error, the inverter-charger will continue to operate using the last communicated battery values which will eventually cause the batteries to invoke protection. |
Set other settings to match the user preferences or the particular use case.