
There may be instances when closed-loop communication is not possible, such as when either the ReadyBMS module or LYNK II Communication Gateway has failed. Whenever possible, use a closed-loop configuration.
When the only option is to use open loop, follow the steps below to reset the MPPT controller and commission it to use open-loop charge settings.
Reset MPPT Controller
-
From the onboard meter display of the MPPT controller, touch the down arrow to display the Main Menu.
-
Press the arrow buttons to navigate to Main Menu > Setup > Installer Password
Enter the installer password defined in the GenStar Installation, Operation and Maintenance Manual. -
Commands > Factory Reset
Reset the MPPT controller.
Set Up Open Loop
-
Follow the commissioning steps defined in “Setting Closed-loop Configuration on the Morningstar Device”, “Commissioning the GenStar MPPT”, up to step 6.
-
Set Closed Loop BMS to No.
-
Set the Battery Charging Profile (low voltage disconnect / reconnect) to 6 LiFePO4-Low.
-
Set the Battery Load Profile. Set the value in brackets if the application requires a larger contingency reserve on the battery.
-
48 V / 52.8 (50 V / 52.6 V)
-
-
Set RTS Required (Remote Temperature Sensor) to No.
-
Reboot the MPPT.
Configuration
-
Power up the GenStar MPPT and confirm it's connected to the network.
-
Connect to the power conversion device by typing GenStar’s IP address into a web browser. (E.g. http://192.168.1.253, find the IP address in Main Menu > SETTINGS > Network)
The LiveView web interface opens. -
In the Installer Access Password field, enter the installer password defined in the GenStar Installation, Operation and Maintenance Manual.
-
INSTALLER SETUP > Charger > Battery Info > Battery Size
Confirm the size is correctly set as the Rated Capacity (Ah) of the battery times the number of batteries. Change the battery size if required. -
INSTALLER SETUP > Charger > Battery Charge Settings
Configure the battery charging profile. Select Custom and set the values as shown in the tables for the battery.
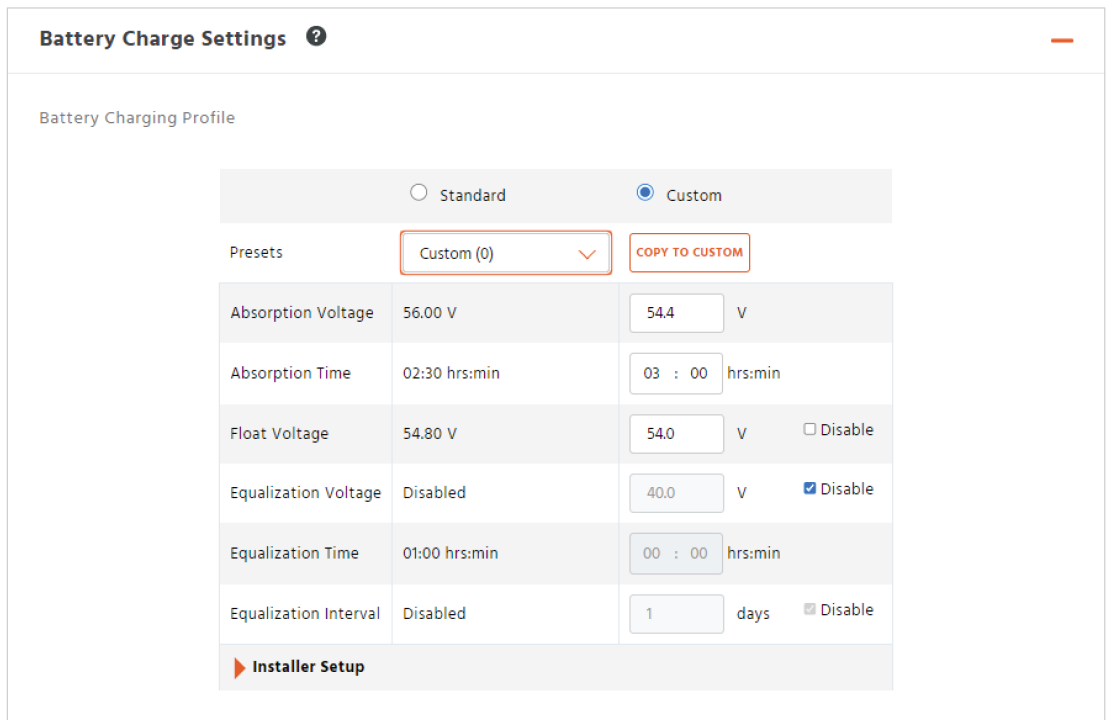
Battery Charge Settings
|
48V |
AES RACKMOUNT
|
HELIOS ESS
|
|---|---|---|
|
Absorption Voltage |
55.2 V |
|
|
Absorption Time |
3 hours |
|
|
Float Voltage |
53.6 V |
|
|
Equalization Voltage |
Disable |
|
|
Equalization Time |
— |
|
|
Equalization Interval |
— |
|
-
INSTALLER SETUP > Charger > Battery Charge Settings > Installer Setup
Set the Temperature Compensation Coefficient to Disabled. -
Reboot the MPPT and start using it with the batteries.
|
NOTE |
|---|
|
Rebooting the MPPT is required to update the MPPT with the edited settings. |